Spent a couple hours going around the car cleaning rusty areas and treating it Hammerite Kurust – especially around the front lower panel which was behind the spoiler.
2hrs

This is my record of the restoration of my 1977 Triumph TR7, I bought the car in 1983 for £1500. Over the four years of driving it I had got married, moved to a 110 year old cottage in need of renovation and given a new company car. The TR was parked in the garage (1987) at the end of the garden. I always joked saying "that one day I put it back on the road". Twenty-four years later (Nov 2011) that day has arrived - wish me luck.
Tuesday, July 24, 2012
Rear axle refitted...
Time to refit the rear axle so I can move and turn the car. Next big job to remove the engine.
Using new ploy bushes I assemble the axle, tie bar and trailing arms. Then using the old shocks and springs for the moment as I will be under sealing and refitting the fuel tank later.
All went back together very easily other then having to adjust brake pads so the drums would fit.
2 hrs
Using new ploy bushes I assemble the axle, tie bar and trailing arms. Then using the old shocks and springs for the moment as I will be under sealing and refitting the fuel tank later.
All went back together very easily other then having to adjust brake pads so the drums would fit.
2 hrs
Sunday, June 24, 2012
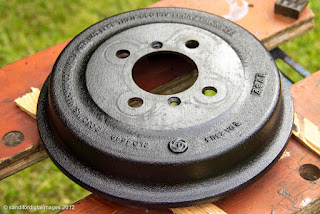
Rear brake drum...
With the brake drums removed from the car, I wired brushed the surface rust off and cleaned the pad faces with wet & dry. Then using Hammerite's Kurust I coated the inside and inside surfaces.
I need to get some high temperature paint to finish off the top coat – black or racing boy red?
30 mins


I need to get some high temperature paint to finish off the top coat – black or racing boy red?
30 mins


Tuesday, June 12, 2012
Down under pt4...
Ok so it was my birthday and I spent 4 hours under the car painting!
Using black Hammerite to seal all the rear floorpan from the rear bulk head to the bumper fittings including inner wheel arches and spare wheel floor.
If you look at the last pic showing prop shaft which I haven't touch yet you can see the contrast – when the final Waxoyl is applied it should be well protected.
4 hrs

 |
| Before cleaning |


Sunday, May 27, 2012
94 hrs...
Just added up of hours so far, as of 28.05.2012 = 94 hrs
One of the reasons for keeping this blog was the keep a record of my time spent – still a very long way to go!
2 mins [94 hrs, 2mins]
One of the reasons for keeping this blog was the keep a record of my time spent – still a very long way to go!
2 mins [94 hrs, 2mins]
Down under pt3...
After cleaning up the rear floorpan area it was time to tackle the surface rust with a converter. Using Hammerite Rust Beater as my first stage, followed by good coat of Stone Clip. Then I will be finishing it off getting into all the hidden areas with Waxoyl.
6 hrs


6 hrs
 |
| My new best friend! |


Sunday, May 20, 2012
Down under pt2...
I continued today with the cleaning of the rear floorpan around the fuel tank area and the left side wheel arch, using a hot air stripper to soften the old under-seal. Then with a rag and white spirit to cleaned the surface.
Next step will be to treat the rusty surfaces with a rust converter followed by a coat of black stone chip paint. Then at a later stage the whole underside will be Waxoyl sealed.
6 hrs
Next step will be to treat the rusty surfaces with a rust converter followed by a coat of black stone chip paint. Then at a later stage the whole underside will be Waxoyl sealed.
6 hrs
Subscribe to:
Posts (Atom)