Sump pan - with all the nuts and bolts cleaned I did a dry fit. Then I removed them using a sheet of cardboard with holes to keep the bolts in the correct order. The front left hand engine mount had been already striped and painted with nuts and bolts identified.
I gave the block and flange one last wipe around with degrease and placed the gasket and sump pan, arranged the engine mount and hand tightened the bolts, then torqued them up. Finally a quick spay for black satin to cover any exposed metal.
3hrs
This is my record of the restoration of my 1977 Triumph TR7, I bought the car in 1983 for £1500. Over the four years of driving it I had got married, moved to a 110 year old cottage in need of renovation and given a new company car. The TR was parked in the garage (1987) at the end of the garden. I always joked saying "that one day I put it back on the road". Twenty-four years later (Nov 2011) that day has arrived - wish me luck.
Sunday, May 5, 2013
Tuesday, April 30, 2013
Engine rebuild pt6...
Timing cover, timing cover... I've spent lots of time trying the cleaning my old one, so when I saw a new one on Rimmer Bros clearance sale for a £10 I bought one!
I say new - it came in a sealed box with blue BL logo on it, so new thirty years ago maybe.
I'm going to refit my electric fan kit, so I don't need to install the top pulley assembly, viscous coupling and fan blades - to cover the casting flanges I cutout a plate from 3mm aluminium.
Fitted the cover with the newly painted timing marks plate and the cleaned alternator brackets. Also fitted the front lifting eye.
4hrs
I say new - it came in a sealed box with blue BL logo on it, so new thirty years ago maybe.
I'm going to refit my electric fan kit, so I don't need to install the top pulley assembly, viscous coupling and fan blades - to cover the casting flanges I cutout a plate from 3mm aluminium.
Fitted the cover with the newly painted timing marks plate and the cleaned alternator brackets. Also fitted the front lifting eye.
4hrs
![]() |
| My old one before trying to clean |
Friday, April 26, 2013
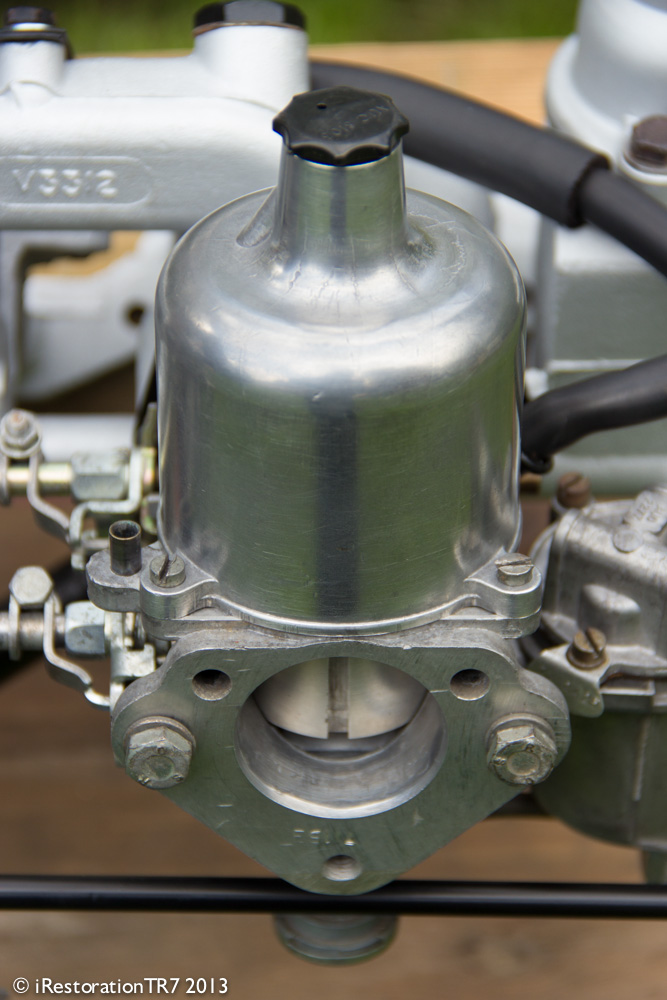
Twin SU's back together...
With most of the parts ready for assemble I didn't want to put the carbs/inlet onto the engine just yet - so I built a wooden stand to mount the inlet manifold which I could then assemble the carbs, linkage and pipes on.
I setup the needles and jets as per the manual, this is a starting point for tuning and will be fine tuned when the engine is running.
With both carbs I positioned the centre linkage and pushed them on, connected the fuel and breather pipes. Fitted blanking plate and the heater pipe temporarily.
Finally had another go at polishing the suction chamber (the tops), using wet & dry and wire wool to clean the surface and some good old elbow action. Going to see if I can buy a polish disk to get that chrome look.
5hrs
I setup the needles and jets as per the manual, this is a starting point for tuning and will be fine tuned when the engine is running.
With both carbs I positioned the centre linkage and pushed them on, connected the fuel and breather pipes. Fitted blanking plate and the heater pipe temporarily.
Finally had another go at polishing the suction chamber (the tops), using wet & dry and wire wool to clean the surface and some good old elbow action. Going to see if I can buy a polish disk to get that chrome look.
5hrs
Fuel pump cleaned...
I had removed the fuel pump from the donor car, but mine was in better condition with less surface rust on the top. I stripped it down and popped it in the cleaner for hour.
The level was very stiff at first but after 30mins it began to free up after soaking in the hot fluids.
Using wire wool I prepared the surfaces and gave it a coat of satin black.
1.30hrs
The level was very stiff at first but after 30mins it began to free up after soaking in the hot fluids.
Using wire wool I prepared the surfaces and gave it a coat of satin black.
1.30hrs
Saturday, April 20, 2013
Engine rebuild pt5...
Fitted the recon water pump into block and with a selection of gaskets to get the correct clearance between the pump top bolt and the inside cover flange.
Also cleaned and fitted the oil cooler transfer housing adaptor to the block - fitted the oil pressure switch/pressure gauge T pipe - I going to refit the Smiths gauges I had removed when stripping car years ago. The oil cooler also has a temperature gauge and two others I have are a vacuum and water temperature if my memory recalls - I think I need to go and find them!
Dropped in the distributor and cam cover for these pics - looking good.
2hrs
Also cleaned and fitted the oil cooler transfer housing adaptor to the block - fitted the oil pressure switch/pressure gauge T pipe - I going to refit the Smiths gauges I had removed when stripping car years ago. The oil cooler also has a temperature gauge and two others I have are a vacuum and water temperature if my memory recalls - I think I need to go and find them!
Dropped in the distributor and cam cover for these pics - looking good.
2hrs
Distributor overhaul...
I got the box down from the loft with the distributor assembly, HT leads, coil and Lumenition electronic ignition kit. I started by stripping the distributor and putting the parts into the cleaner. I removed the one from the donor car but with 98,000 miles on it and looks worn and rusty.
The donor car also had a Lumenition ignition kit which I have removed for parts or selling - they cost around £180 new.
After cleaning, I painted the distributor cap clips and the face of the retard chamber then I reassembled the unit. I do need to replace the small grommet which allow the wires out and the O ring/seal.
3hrs
The donor car also had a Lumenition ignition kit which I have removed for parts or selling - they cost around £180 new.
After cleaning, I painted the distributor cap clips and the face of the retard chamber then I reassembled the unit. I do need to replace the small grommet which allow the wires out and the O ring/seal.
3hrs
Tuesday, April 16, 2013
Engine rebuild pt4...
New parts delivered today from Robsport - recon water pump and oil pump O rings and drive shaft.
Feeling the movement of the recon water pump it was a good move to replace my old one. Popped over to my local post office and posted it back for my exchange refund.
Wiped down the oil pump and lubricated it with some STP oil, I reassembled the pump using the new O rings and bolted it to the engine block. Then together with a new filter, I fitted the oil filter bowl.
With a new gasket I then fitted the oil pick-up pipe/strainer - all the oily bits are coming together!
1.30hrs
Feeling the movement of the recon water pump it was a good move to replace my old one. Popped over to my local post office and posted it back for my exchange refund.
Wiped down the oil pump and lubricated it with some STP oil, I reassembled the pump using the new O rings and bolted it to the engine block. Then together with a new filter, I fitted the oil filter bowl.
With a new gasket I then fitted the oil pick-up pipe/strainer - all the oily bits are coming together!
1.30hrs
Subscribe to:
Posts (Atom)